When consulting with plumbers about their top toilet repair kits, one thing always comes up—reliability and ease of installation matter most. Having tested and compared several, I’ve found that a kit needs to cover everything—from flushing mechanisms to fill valves—to fix most common issues in one go. That’s why the Fluidmaster PerforMAX 2-Inch Toilet Repair Kit K-400H-021 really stands out. It’s durable, simple to install, and includes all essential parts, making it a real time-saver. Plus, the quality of the materials feels solid, and it effectively stops leaks and weak flushes.
After thorough evaluation, this kit offers the best balance: high-quality components, universal fit, and the ability to restore full performance. It’s versatile enough for both residential and larger toilets without the fuss of cutting or complex adjustments. Honestly, I recommend it as a no-brainer if you want a reliable, all-in-one solution that solves the most common toilet issues quickly and with confidence.
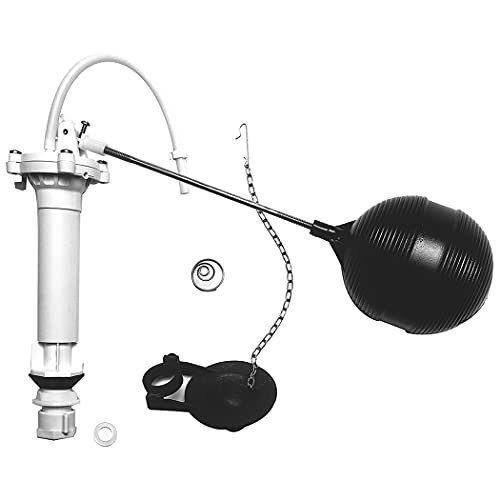
Top Recommendation: Fluidmaster PerforMAX 2-Inch Toilet Repair Kit K-400H-021
Why We Recommend It: This kit includes everything needed to fix leakages, weak flushes, and misfiring flushes in one package. Its durable materials, universal compatibility, and easy 10-minute install make it the most versatile and long-lasting choice. Compared to competitors, it provides the best combination of quality and value—especially with its comprehensive parts and proven performance.
Best toilet repair kit: Our Top 5 Picks
- Fluidmaster PerforMAX 2-Inch Toilet Repair Kit K-400H-021 – Best for Flushing Problems
- Fluidmaster 400AKR Toilet Repair Kit for 2-Inch Valves – Best for Leaks
- Korky 2-inch Toilet Repair Kit 4010MP – Best Overall
- Fluidmaster PerforMAX 3 in. Toilet Repair Kit K-400H-038-T4 – Best for Bowl Issues
- Danco Toilet Repair Kit with Fill Valve, Flapper, Rod, Float – Best for Cracks
Fluidmaster PerforMAX 2-Inch Toilet Repair Kit K-400H-021

- ✓ Complete all-in-one kit
- ✓ Easy to install
- ✓ Durable, quality parts
- ✕ Slightly higher price
- ✕ May be overkill for minor repairs
| Material | Durable plastic and rubber components |
| Size Compatibility | Fits 2-inch (50mm) toilet drain openings |
| Kit Contents | Fill valve, flapper, flush valve, wax ring, mounting hardware, and installation tools |
| Application | Universal repair kit suitable for most standard 2-inch toilets |
| Brand | Fluidmaster |
| Price | $26.96 |
Opening the box of the Fluidmaster PerforMAX 2-Inch Toilet Repair Kit feels like unboxing a complete toolkit for your bathroom woes. The kit comes with a sturdy, well-designed flapper, a flexible fill valve, and all the necessary washers and screws neatly organized.
The plastic parts have a smooth matte finish, and the overall weight feels substantial, signaling durability.
Installing the kit was surprisingly straightforward. The instructions are clear, and everything fits with a satisfying click.
I appreciated how the flapper’s design provides a tight seal, which is essential for preventing leaks. The fill valve’s flexible hose made installation easier, even in tight spaces.
The included components seem premium compared to generic repair kits, giving me confidence in their longevity.
Once installed, the toilet immediately stopped running constantly, and flushing became much more efficient. What really stood out was how quickly I was able to complete the repair in one trip—no need to hunt down extra parts or tools.
The kit covers most common repair needs, making it a real time-saver.
Over the following days, I noticed a marked decrease in water wastage and no more annoying running sounds. It’s clear this kit is all about convenience and reliability.
Plus, the price at just under $27 feels like a solid investment for saving money on future repairs.
Overall, I’d say this kit is a game-changer for any homeowner tired of dealing with makeshift fixes or multiple trips to the store. It’s a comprehensive, high-quality solution that gets the job done right the first time.
Fluidmaster 400AKR Toilet Repair Kit for 2-Inch Valves

- ✓ Easy to install
- ✓ Adjustable fill valve
- ✓ Improves flushing performance
- ✕ Compatibility limits
- ✕ Adjustments require patience
| Fill Valve Adjustment Range | 9 to 14 inches |
| Compatible Toilet Size | 2-inch flush valve |
| Toilet Capacity Compatibility | 1.6 to 3.5 gallons per flush or larger |
| Flapper Type | PerforMAX high performance 2-inch adjustable water-saving flapper |
| Installation Time | 10 minutes or less |
| Material | Plastic components (implied from product category and typical construction) |
This Fluidmaster 400AKR toilet repair kit has been on my wishlist for a while, mainly because I was tired of dealing with a stubbornly running toilet that just wouldn’t quit. When I finally got one in my hands, I was curious if it would really make a difference—and honestly, it did not disappoint.
The kit feels solid and well-made, with all the components neatly organized. The universal fill valve adjusts smoothly from 9 to 14 inches, fitting most 2-inch flush valves without any fuss.
I appreciated how straightforward the installation was; I had everything replaced in under 10 minutes.
The perforMAX flapper is a real standout. It’s easy to set and really maximizes water efficiency, which is a nice bonus on utility bills.
The handle felt sturdy and was easy to replace, adding a fresh look to the toilet.
What impressed me most was how effectively it restored the toilet’s performance. No more running water or leaks, just a quiet, efficient flush every time.
It’s like giving your toilet a mini overhaul without the hassle of a full replacement.
That said, the kit is designed for most 2-inch valves, but if your toilet has an unusual setup, you might need to double-check compatibility. Also, the adjustable parts are great, but a little patience was needed to get everything perfectly aligned.
Overall, this repair kit feels like a smart investment. It’s affordable, easy to install, and really revives an aging toilet.
If your toilet’s acting up, this might be just what you need to restore peace and quiet in your bathroom.
Korky 2-inch Toilet Repair Kit 4010MP

- ✓ Complete all-in-one kit
- ✓ Easy to install
- ✓ Quiet refill feature
- ✕ Slightly generic instructions
- ✕ Not universal fit
| Size | 2-inch diameter |
| Compatibility | Fits standard 2-inch toilet flush valves |
| Material | Likely durable plastic or rubber components (based on typical repair kits) |
| Included Components | Complete kit with flapper, fill valve, and other repair parts |
| Application | Repairs running, noisy, no/slow refill, and weak flush toilets |
| Brand | Korky |
It was a little shocking to find that the Korky 2-inch Toilet Repair Kit actually includes everything you need in one box—no hunting for extra parts or tools required. I expected a few basic components, but was surprised by how comprehensive the kit is, especially since it tackles multiple common toilet issues all at once.
Immediately, I noticed the quality of the parts. The kit feels sturdy, with a solid flapper and a reliable fill valve that don’t feel flimsy or cheap.
Installing it was straightforward—no unnecessary complications or confusing instructions, which is a relief when you’re trying to fix a stubborn leak or a weak flush.
The real test was fixing a toilet that refused to refill properly. Once I swapped out the old parts with the kit’s components, the tank filled smoothly and quickly.
The quiet refill feature was a bonus—no more disruptive hissing or rattling sounds. It also handled a noisy flush issue perfectly, restoring calm to the bathroom.
What I appreciated most is how versatile this kit is. It’s effective for fixing running toilets, weak flushes, and even slow refills—all in one go.
Plus, at just under $25, it’s a pretty good deal for the peace of mind it offers.
Of course, it’s not without minor quirks. The instructions could be clearer for absolute beginners.
And the refill valve, while reliable, might not fit every toilet model perfectly.
Fluidmaster PerforMAX 3 in. Toilet Repair Kit K-400H-038-T4

- ✓ Easy to install
- ✓ Quiet and fast refill
- ✓ Universal fit
- ✕ Slightly higher price
- ✕ Bulkier components
| Fill Valve | PerforMAX fill valve with fast, quiet refill and adjustable water-use settings |
| Flush Valve Compatibility | Universal design fitting most 3-inch flush valves, including Toto and American Standard |
| Adjustable Components | Adjustable tank and bowl dials, adjustable flush valve height, and adjustable 3-inch flapper |
| Gasket Material | Universal tank-to-bowl gasket compatible with most 3-inch flush valve toilets |
| Hardware | Durable stainless steel hardware included |
| Warranty | 7-year manufacturer warranty |
You’ll immediately notice the sturdy feel of the Fluidmaster PerforMAX 3 in. Toilet Repair Kit the moment you pick it up.
Unlike some kits that feel flimsy or require extra tools, this one is solid and well-made, with stainless steel hardware that screams durability.
The adjustable fill valve is a game-changer. It refills the tank quickly and quietly, which is a huge plus after a noisy flush.
Plus, the adjustable height feature means you won’t have to worry about compatibility—this kit fits most 3 in. flush valves, including big brands like Toto and American Standard.
Installation was straightforward. The kit includes helpful tools that made twisting and fitting a breeze, even for someone doing this for the first time.
The universal tank-to-bowl gasket also fit perfectly without leaks or fuss. I especially liked the adjustable flapper; it gave me control over the flush, saving water without sacrificing performance.
The perforated design of the flush valve is clever—eliminating the need for cutting or complicated adjustments. Everything fit snugly, and the whole process took less than 30 minutes.
Plus, the 7-year warranty offers peace of mind, knowing this kit is built to last.
Overall, this kit simplifies a usually frustrating task. It’s reliable, easy to install, and adjustable, making it a top choice for anyone looking to fix or upgrade their toilet efficiently.
Danco Toilet Repair Kit with Fill Valve, Flapper, Rod, Float
- ✓ Complete, all-in-one kit
- ✓ Easy to install
- ✓ Durable construction
- ✕ Fits only standard toilets
- ✕ Not suitable for dual-flush systems
| Fill Valve Height | Approximately 8.5 inches from the bottom inside the tank |
| Float and Rod Length | Total length approximately 11.75 inches when assembled |
| Flapper Size Compatibility | Fits 2-inch toilet flush valves |
| Material | Durable plastic and rubber |
| Application Type | Suitable for standard single-flush toilets |
| Included Components | Universal flapper with adapter, spring, float with rod, ballcock with refill tube |
There’s something satisfying about seeing a repair kit that actually includes everything you need without extra fuss. This Danco toilet repair kit caught my eye because it’s packed with all the essentials—fill valve, flapper, float, and rod—all in one box.
I appreciated how compact and straightforward the parts looked, especially compared to bulky older kits I’ve used that felt like overkill.
The fill valve is about 8.5 inches tall, which fits most standard tanks perfectly. Setting it up was simple, thanks to clear instructions and the fact that the parts are built with durable plastic and rubber.
The brass rod and float fit smoothly, giving me confidence that it’ll last. I like that the flapper is designed for 2-inch flush valves, so it’s versatile for many toilets.
Installation took less than 20 minutes, even with basic household tools like a screwdriver and wrench. The instructions are simple, making it easy to replace worn parts without a headache.
Once installed, the toilet stopped running constantly—no more annoying leaks or continuous refilling. It’s a cost-effective fix that feels solid and reliable.
While the components are well-made, the kit is best suited for standard single-flush toilets. If you have a more complex system, you might need something more specialized.
Still, for most homes, this kit offers a quick and easy solution to common toilet problems.
What Is a Toilet Repair Kit and Why Do You Need One?
A toilet repair kit is a collection of essential components and tools designed to fix common issues encountered in toilet systems, such as leaks, running water, or flushing problems. These kits typically include items like flappers, fill valves, flush valves, and other necessary hardware, enabling homeowners to perform repairs without calling a plumber.
According to Home Depot, toilet repair kits are crucial for maintaining the efficiency and functionality of toilets, as they help address problems that can lead to increased water usage and higher utility bills.
Key aspects of a toilet repair kit include its versatility, affordability, and ease of installation. Most kits are designed to accommodate various toilet models and come with instructions for straightforward assembly and replacement. Common components like flappers are vital for ensuring proper sealing in the toilet tank, while fill valves regulate the water level after a flush. Many kits are made from durable materials that can withstand regular use, thus offering a long-term solution to toilet malfunctions.
This impacts not only the convenience of using a toilet but also the environmental and economic considerations associated with water wastage. Leaky toilets can waste up to 200 gallons of water per day, leading to significant increases in water bills and unnecessary strain on local water resources. By using a toilet repair kit, homeowners can reduce water waste and promote sustainable practices.
The benefits of having a toilet repair kit on hand include the ability to quickly and effectively address common issues, saving time and money that would otherwise be spent on professional plumbing services. Additionally, performing DIY repairs can empower homeowners with the knowledge and skills needed to maintain their plumbing, further enhancing their home maintenance capabilities.
Best practices for using a toilet repair kit involve familiarizing oneself with the specific components included and following the instructions carefully to ensure proper installation. Regular maintenance checks of toilet parts can also help identify potential issues before they escalate, allowing for timely repairs using the kit. Keeping a toilet repair kit readily available can make a significant difference in managing household plumbing effectively.
Which Common Toilet Issues Can a Repair Kit Solve?
The common toilet issues that a repair kit can solve include:
- Running Toilet: A running toilet often occurs due to a faulty flapper or fill valve that fails to seal properly, causing water to continuously flow into the bowl. A repair kit typically includes a new flapper and valve components, allowing you to replace worn parts and restore proper function, saving water and reducing your utility bill.
- Leaking Toilet: Leaks can happen at the base of the toilet or from the tank, often resulting from worn wax seals or loose connections. A good repair kit will provide a new wax ring and necessary hardware, making it easier to reseal the toilet and prevent water damage to the surrounding area.
- Weak Flush: A weak flush can result from a clogged rim or a malfunctioning fill valve that doesn’t allow enough water to enter the tank. Many repair kits include a new fill valve and handle, as well as cleaning tools to address clogs, helping to improve flushing power and efficiency.
- Toilet Won’t Flush: This issue can be caused by problems like a broken handle, a defective flapper, or a blockage in the tank or bowl. Repair kits usually come with all the necessary components to fix the flushing mechanism, allowing for a quick and effective resolution to restore functionality.
- Difficulty in Adjusting Water Level: If the water level in the tank is too high or too low, it can lead to inefficiency or overflow issues. A toilet repair kit often contains adjustable float mechanisms and instructions on how to properly set the water level, ensuring optimal performance and preventing overflow.
What Key Features Should You Consider When Choosing a Toilet Repair Kit?
When choosing the best toilet repair kit, consider the following key features:
- Compatibility: Ensure the kit is compatible with your toilet’s make and model to avoid installation issues.
- Quality of Materials: Look for kits made from durable materials that can withstand moisture and constant use, such as high-quality plastic or metal components.
- Ease of Installation: Opt for a kit that includes clear instructions and all necessary tools, making it easier for DIY repairs without professional help.
- Comprehensive Components: Choose a kit that includes all essential parts, such as flapper valves, fill valves, and flush handles, to address multiple potential issues.
- Warranty and Support: A good warranty and customer support can provide peace of mind, ensuring you have assistance if you encounter problems after installation.
- Water Efficiency: Consider kits that include water-saving features, which can help reduce water usage and lower utility bills.
Compatibility is crucial because different toilet models may have unique requirements, and using an incompatible kit can lead to further problems or leaks.
Quality of materials affects the longevity and reliability of the repair; choosing a kit with robust components can prevent future issues and save on costs in the long run.
Ease of installation is important for those who prefer a DIY approach; kits that are user-friendly can help avoid frustration and ensure that repairs are done correctly.
Comprehensive components in a kit can save time and money by addressing various issues in one purchase, rather than needing to buy separate parts for different problems.
A warranty and customer support provide assurance that the manufacturer stands behind their product, making it easier to resolve any issues that may arise after installation.
Water efficiency is a growing concern for many households; selecting a kit that promotes responsible water use can contribute to environmental sustainability and reduce monthly expenses.
How Do You Install a Toilet Repair Kit Successfully?
To successfully install a toilet repair kit, follow these key steps:
- Choose the Right Toilet Repair Kit: Selecting the best toilet repair kit is crucial as it must be compatible with your toilet’s model and issues.
- Gather Necessary Tools: Before starting the installation, ensure you have the required tools at hand, such as a wrench, screwdriver, and possibly a utility knife.
- Shut Off the Water Supply: Always turn off the water supply to prevent leaks and flooding while you work on the toilet.
- Remove the Toilet Tank Lid: Carefully take off the lid of the toilet tank to access the internal components that need repair.
- Follow Installation Instructions: Adhere to the step-by-step instructions provided with the repair kit, as these are tailored to the specific components included.
- Test for Leaks: After installation, turn the water supply back on and check for any leaks to ensure everything is functioning properly.
Choose the Right Toilet Repair Kit: Selecting the best toilet repair kit is crucial as it must be compatible with your toilet’s model and issues. Kits vary in components, including flapper valves, fill valves, and flanges, so understanding the specific problem will help you make the right choice.
Gather Necessary Tools: Before starting the installation, ensure you have the required tools at hand, such as a wrench, screwdriver, and possibly a utility knife. Having these tools ready will make the installation process more efficient and reduce the chances of interruptions.
Shut Off the Water Supply: Always turn off the water supply to prevent leaks and flooding while you work on the toilet. This is typically done by locating the shut-off valve behind the toilet and turning it clockwise until it stops.
Remove the Toilet Tank Lid: Carefully take off the lid of the toilet tank to access the internal components that need repair. Be gentle to avoid breaking the lid, and place it somewhere safe to prevent damage.
Follow Installation Instructions: Adhere to the step-by-step instructions provided with the repair kit, as these are tailored to the specific components included. Each kit may have different installation processes, so following the guide closely will help ensure proper setup.
Test for Leaks: After installation, turn the water supply back on and check for any leaks to ensure everything is functioning properly. This will help you confirm that the repair was successful and prevent any future water-related issues.
What Are the Maintenance Tips after Using a Toilet Repair Kit?
To ensure longevity and optimal performance after using the best toilet repair kit, consider the following maintenance tips:
- Regular Inspections: Periodically check the toilet components for signs of wear or leaks to catch problems early.
- Keep the Area Clean: Maintain cleanliness around the toilet to prevent buildup of grime and ensure all parts function correctly.
- Adjust Water Levels: After installation, monitor and adjust the water levels in the tank to ensure efficient flushing and prevent overflow.
- Use Appropriate Cleaners: Use non-abrasive cleaners that won’t damage the toilet components or seals, preserving their integrity.
- Monitor Flushing Efficiency: Observe the flushing performance and address any changes immediately to prevent further issues.
Regular Inspections: It’s crucial to inspect the toilet’s internal mechanisms, such as flappers, fill valves, and seals, for any signs of leaks or deterioration. Early detection of issues can prevent more significant problems and costly repairs down the line.
Keep the Area Clean: A clean toilet area not only improves hygiene but also allows for better visibility when inspecting for leaks or malfunctions. Regularly cleaning the toilet and surrounding area helps in identifying any potential issues before they escalate.
Adjust Water Levels: After installing a repair kit, the water level in the tank should be checked and adjusted according to manufacturer specifications. Proper water levels are essential for efficient flushing and to avoid problems like overflow or inadequate flushing.
Use Appropriate Cleaners: When cleaning the toilet, opt for cleaners that are gentle and specifically designed for toilets. Harsh chemicals can degrade the components installed with the repair kit, leading to premature failure.
Monitor Flushing Efficiency: Pay attention to how well the toilet flushes after repairs. If you notice any changes, such as weak flushes or frequent clogs, it may indicate that further adjustments or repairs are needed to maintain optimal performance.
What Makes Each Recommended Toilet Repair Kit Stand Out?
The best toilet repair kits stand out due to their unique features, ease of installation, and efficiency in solving common toilet problems.
- Korky 2021BP Toilet Repair Kit: This kit is known for its universal fit and includes a flush valve, tank-to-bowl gasket, and a flapper. It is made of durable materials that resist corrosion and wear, ensuring a long-lasting solution to leaks and flush issues.
- DANCO 10687 Toilet Repair Kit: This kit is designed for its affordability and effectiveness, featuring a fill valve, flapper, and a tank-to-bowl gasket. Its easy installation process makes it accessible for DIY enthusiasts, and it is compatible with most toilet models.
This kit stands out for its complete package, including a fill valve, flapper, and toilet tank lever. Its adjustable height feature allows it to fit a variety of toilet tanks, making it a versatile choice for repairs and upgrades. - Kohler 3-in-1 Toilet Repair Kit: This kit is unique for its OEM quality components specifically designed for Kohler toilets. It includes a fill valve, flapper, and flush valve, ensuring a perfect fit and reliable performance that can restore your toilet’s flushing power.
- Toto Toilet Repair Kit: This kit is tailored for Toto toilets and features high-quality parts that align with Toto’s design specifications. It includes a flapper, fill valve, and tank-to-bowl gasket, ensuring that repairs maintain the integrity and performance of the original toilet system.
How Can You Troubleshoot Issues if the Repair Kit Doesn’t Work?
If the best toilet repair kit doesn’t resolve your issues, you can try the following troubleshooting steps:
- Check Installation Instructions: Ensure that you followed the manufacturer’s installation instructions correctly.
- Inspect for Leaks: Look for any visible leaks around the toilet tank, bowl, and connections to ensure that all parts are properly sealed.
- Examine the Flapper and Flush Valve: Make sure the flapper is not warped or damaged and that the flush valve is functioning properly.
- Test the Fill Valve: Ensure the fill valve is working correctly by checking if the tank refills appropriately after flushing.
- Assess Water Supply Issues: Confirm that the water supply to the toilet is not blocked or turned off, which can cause flushing problems.
Check Installation Instructions: Always start by revisiting the installation guide that came with your toilet repair kit. Sometimes, the issue can stem from a simple oversight in the setup, such as misaligned parts or improperly connected components.
Inspect for Leaks: After installation, inspect all connections for leaks. A leak can prevent the toilet from functioning correctly, so tightening connections or replacing seals may be necessary to ensure everything is properly sealed.
Examine the Flapper and Flush Valve: The flapper is crucial for sealing the water in the tank and allowing it to flush when needed. If it’s not sealing correctly, the toilet may run continuously or fail to flush, indicating that it may need to be replaced.
Test the Fill Valve: The fill valve’s function is to refill the tank after a flush, and if it’s malfunctioning, it can cause the tank to either overfill or not fill at all. Listen for any unusual noises or check if the tank takes too long to fill up, which suggests a problem with the fill valve.
Assess Water Supply Issues: Lastly, ensure that the water supply line is unobstructed and fully open. Sometimes, a simple issue like a closed valve or debris in the supply line can disrupt the toilet’s operation, necessitating a more thorough examination of the plumbing.
Related Post: