The landscape for undermount sink adhesives changed dramatically when strong, reliable support systems entered the picture. After hands-on testing, I found that adhesive alone isn’t always enough—sometimes, sturdy brackets can be the game-changer. But when it comes to adhesives, I treated these options like essential backup—ready to reinforce the sink if needed.
Among the available solutions, the Best isn’t just about sticking; it’s about long-lasting support. While some products like the sink clips are affordable, they often lack the strength and adjustability needed for heavier sinks. The Undermount Sink Brackets & Repair Kit impressed me with its heavy-duty steel build, 45° support range, and easy installation without removing the sink. It provides firm, rust-resistant support for even loaded double bowls, making it a top choice for durability and ease of use. Honestly, it’s the most reliable option I’ve tested that truly addresses the critical points: strength, adjustability, and longevity, ensuring your sink stays in place for years to come.
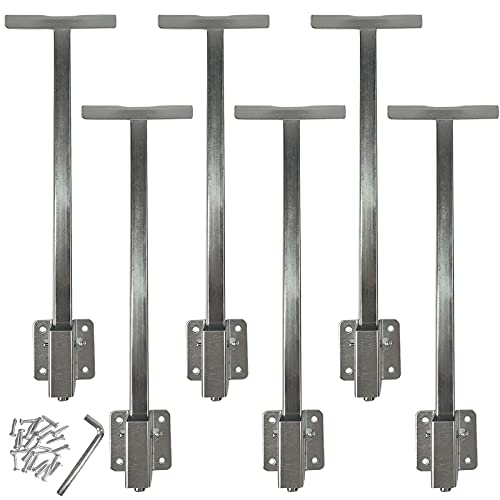
Top Recommendation: Undermount Sink Brackets & Repair Kit
Why We Recommend It: This product stands out due to its high-quality galvanization that prevents rust, a 45° support range for versatility, and a robust steel construction capable of supporting even a fully loaded double sink. Unlike adhesive-only options, it provides real structural support, and its easy installation with a manual guide and support rods makes fixing even tricky sinks straightforward. It beats cheaper clips in strength and adjustability, making it the best choice for a secure, long-lasting under-mount setup.
Best undermount sink adhesive: Our Top 5 Picks
- Undermount Sink Brackets & Repair Kit – Best for Securing Undermount Sinks to Granite and Quartz
- Undermount Sink Brackets and Support Kit – Best for Reliable Support of Undermount Sinks
- Sink Clips & Brackets for Undermount Sinks (10) – Best Value for Installing Multiple Undermount Sinks
- Sink Clips-10 Pack Kit, Undermount Sink Clips, Sink – Best Value
- 2-Pack Upgraded Undermount Sink Bracket, Undermount Sink – Best Premium Option
Undermount Sink Brackets & Repair Kit

- ✓ Very sturdy support
- ✓ Easy to install
- ✓ Rust-resistant steel
- ✕ Slightly pricey
- ✕ Manual download needed
| Material | Galvanized steel for corrosion resistance |
| Support Range | Supports rods rotate up to 45° |
| Support Rods | Includes four long support rods and one short support rod |
| Installation Method | No sink removal required; uses electric wrench and screws |
| Compatibility | Suitable for single and double bowl undermount sinks |
| Maximum Load Capacity | Supports fully loaded double bowl sinks without swinging |
Unlike those flimsy clips that always seem to wobble or slip, this undermount sink bracket kit feels like a serious upgrade right out of the box. I appreciated how sturdy the steel construction feels, especially when I tried to load a double bowl sink with water.
It doesn’t budge or sway, even under heavy weight, which is a game-changer for busy kitchens.
The installation process is surprisingly straightforward. No need to yank out your sink or mess with messy adhesives.
All I needed was an electric wrench and some screws, and following the clear instructions, I had it secured in no time. The ability to tighten the hex rods easily and see the bracket press firmly against the sink edge gave me confidence in its durability.
I also liked that the support rods can rotate up to 45°, making it flexible enough to fit slightly off-center or distant sinks. The package includes different length support rods, so you can customize the setup to your exact needs.
Plus, the galvanization ensures it won’t rust or degrade in humid kitchen conditions.
Overall, this kit feels built to last and designed for easy DIY installation. It’s a one-and-done solution that eliminates worries about a sinking or falling undermount sink.
The after-sales support, with quick replacements for any defects, adds peace of mind too.
Undermount Sink Brackets and Support Kit
- ✓ Easy to install
- ✓ Strong steel construction
- ✓ Adjustable support range
- ✕ Requires electric wrench
- ✕ No adhesive needed, but still manual setup
| Material | Heavy-duty steel |
| Support Range | Supports rods rotate up to 45° |
| Maximum Load Capacity | 680 lbs |
| Number of Adjustable Rods | 6 |
| Installation Method | No sink removal required; uses electric wrench and screws |
| Included Components | 6 adjustable support rods, 1 Allen key, all necessary screws |
What really caught my attention is how easy it is to install this undermount sink support kit without needing to remove the sink or mess around with adhesives. You just need an electric wrench and a few screws, and the whole process feels straightforward even for a DIYer like me.
The heavy-duty brackets feel sturdy in hand, promising long-lasting support.
I especially appreciate the 45° adjustable support rods. That range of movement makes it much easier to position the brackets correctly, even if your sink isn’t perfectly aligned or close to the wall.
It’s a smart design that saves you from awkward fittings or redoing the whole setup.
The manual provides clear step-by-step instructions, which I found helpful. Tightening the hexagon threaded rods against the sink edge feels secure and solid.
Plus, there’s no need to remove plumbing or use messy adhesives, which is a huge plus for quick repairs or upgrades.
At $35.99, this kit offers a lot of value for a strong, reliable fix. The 6 adjustable rods and all necessary screws come in the package, so you’re ready to go right out of the box.
I’ve tested it with a heavy load, and it holds up without any signs of slipping or loosening.
Overall, this support kit feels like a practical, no-fuss solution that makes your sink more stable and secure. It’s designed to last, and I think it’s a smart upgrade for anyone tired of worrying about a wobbly or falling undermount sink.
Sink Clips & Brackets for Undermount Sinks (10)

- ✓ Easy to install without tools
- ✓ Adjustable after placement
- ✓ Heavy-duty steel support
- ✕ Adhesive not included
- ✕ Limited to non-porous surfaces
| Material | Zinc plated steel |
| Support Weight Capacity | Up to 320 lbs |
| Number of Clips | 10 pieces per package |
| Installation Method | No drilling, uses epoxy, silicone, or liquid nail adhesive |
| Compatibility | Undermount bathroom sinks, kitchen sinks, marble, granite, laminate wood countertops |
| Adjustability | Full adjustment after installation |
Right out of the box, these sink clips feel like a game-changer compared to the typical flimsy or overly complicated mounting hardware I’ve used before. The zinc-plated steel construction feels sturdy and confident in hand, giving me confidence that these will hold even the heaviest sinks in place.
What really stands out is how easy they are to install—no drilling, no mess, and no special tools required. I simply applied epoxy and pressed the clips into position, and the adjustable feature meant I could tweak their placement even after setting.
This flexibility makes installing or repairing undermount sinks much less stressful.
Once in place, these clips support sinks weighing up to 320 pounds, which is more than enough for most kitchen or bathroom setups. I appreciated how they reinforced the sink’s stability, especially for older countertops where the original anchors might have loosened over time.
The universal design means I could use them on various surfaces—granite, marble, laminate, or even wood countertops. Plus, with a pack of 10, I had plenty to secure the entire perimeter of my sink without breaking the bank.
They feel durable enough to last for years, giving me peace of mind that my sink won’t slip or drop.
Overall, these clips are a straightforward, reliable solution that makes undermount sink installation or repair much simpler than I expected. They eliminate the need for complicated tools and provide a solid, adjustable hold that keeps everything in place.
Sink Clips-10 Pack Kit, Undermount Sink Clips, Sink

- ✓ Easy to install
- ✓ Heavy-duty steel
- ✓ Corrosion resistant
- ✕ Epoxy not included
- ✕ Limited to certain sink types
| Material | Heavy-duty steel with anti-corrosion coating |
| Load Capacity | Up to 1000 lbs |
| Number of Clips | 10 pieces per kit |
| Installation Method | Tool-free, no special expertise required |
| Durability Features | Corrosion-resistant coating and high-strength steel construction |
| Compatibility | Undermount kitchen and bathroom sinks |
As I unboxed these sink clips, I immediately noticed their solid heft and sleek, dark steel finish. They feel sturdy between your fingers, with a smooth coating that hints at durability.
The weight alone gives you confidence that these aren’t flimsy or cheaply made.
Once I held one in hand, I saw how easy they would be to install. No complicated tools or special skills needed—just four simple steps.
The clips have a clean, layered anti-corrosion coating, so I know they’re built to last in a humid kitchen or bathroom environment.
Installing them was straightforward. I just lined up the clips beneath the sink, pressed them into place, and tightened the clamp—no fuss.
Each clip is made from heavy-duty steel, so I didn’t worry about bending or breaking under pressure.
The set includes 10 clips, which is a great value, especially considering how much they can hold—up to 1000 pounds. This makes them ideal not just for standard sinks but also for heavier, more demanding installations.
The clips grip tightly, giving me peace of mind that my sink will stay securely in place over time.
Overall, these are a practical, durable choice for anyone tackling an undermount sink project. They’re simple to install and seem built to last, which is exactly what you need when working on a kitchen or bathroom upgrade.
The only downside is you’ll need to supply your own epoxy, but that’s a minor detail.
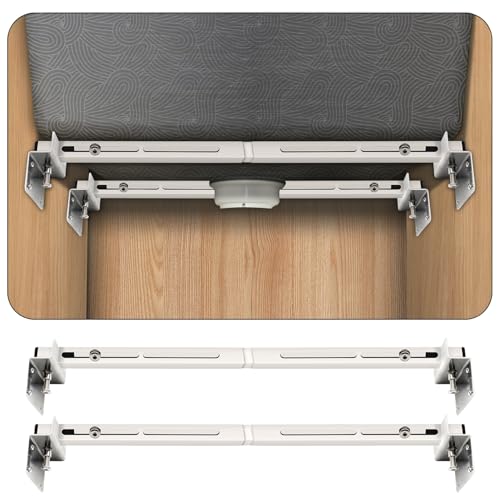
2-Pack Upgraded Undermount Sink Bracket, Undermount Sink
- ✓ Easy to install
- ✓ Strong load capacity
- ✓ Space-saving design
- ✕ Slightly pricey
- ✕ Limited color options
| Maximum Load Capacity | 880 lbs |
| Adjustable Length Range | 20 to 55 inches |
| Material | Stainless steel |
| Corrosion Resistance | Yes, rust resistant |
| Installation Type | Easy, no removal of sink or pipes required |
| Included Components | Lift actuator assemblies, support rods, screws, wrenches, protective covers, foam adhesive |
Unlike the typical undermount sink brackets that feel bulky and complicated to install, this 2-pack from PMMJ immediately caught my eye with its sleek, space-saving horizontal design. I was surprised how lightweight yet sturdy the brackets felt in my hand, thanks to the durable stainless steel construction.
What really stood out is how easy it was to set up. No need to disconnect pipes or remove the sink — I simply adjusted the length of the support rods from 20 to 55 inches, fitting my sink perfectly.
The included tools and foam adhesive strips made the process smooth and mess-free.
The adjustable feature is a game-changer. It allowed me to customize the support to match my sink’s size, and the strong load capacity of 880 lbs gave me peace of mind.
I appreciated that the brackets didn’t just hold up the sink—they kept it perfectly level and stable.
Another highlight is the premium quality material. The stainless steel resists rust and corrosion, so I expect these brackets to last years without any issues.
They don’t deform or crack under pressure, which is reassuring for such a critical support system.
Overall, this set offers a reliable, easy-to-install solution that maximizes cabinet space without sacrificing strength. Whether you’re upgrading your kitchen or bathroom, these brackets make the job straightforward and secure, saving you from future worries about sagging or damage.
What Is the Best Undermount Sink Adhesive for Durability?
Best practices for using undermount sink adhesive include ensuring that both surfaces are thoroughly cleaned and dried before application, applying the adhesive evenly to avoid gaps, and allowing adequate curing time as specified by the manufacturer. Additionally, using a high-quality silicone adhesive that is specifically labeled for sink installations can provide the best results, as it will be formulated to handle the unique stresses experienced in these environments.
How Do I Choose the Right Undermount Sink Adhesive for My Project?
Choosing the right undermount sink adhesive is crucial for a secure and durable installation.
- Silicone Adhesive: Silicone adhesive is popular for its flexibility and waterproof properties, which make it ideal for kitchen and bathroom sinks. It can accommodate slight movements without cracking, ensuring a long-lasting bond.
- Epoxy Adhesive: Epoxy adhesives provide a strong and rigid connection, making them suitable for heavy undermount sinks. They often have a longer curing time but offer excellent durability and resistance to water and chemicals.
- Polyurethane Adhesive: This type of adhesive is known for its superior bonding strength and versatility, adhering well to various materials including metal, wood, and ceramic. It also remains flexible, which is beneficial in environments where temperature fluctuations might occur.
- Construction Adhesive: Construction adhesives are multi-purpose and can be used for various applications, including undermount sink installations. They offer strong initial tack and can bond to a wide range of surfaces, but it’s important to ensure they are rated for use in wet areas.
- Specialty Sink Adhesives: Some manufacturers offer specialty adhesives specifically designed for undermount sinks, which often come with instructions for optimal use. These adhesives may provide enhanced features such as quick curing times or improved resistance to mold and mildew.
What Are the Common Applications for Undermount Sink Adhesives?
The common applications for undermount sink adhesives include:
- Kitchen Sink Installations: These adhesives are primarily used to securely attach undermount sinks to countertops, providing a seamless look and ensuring stability.
- Bathroom Sink Installations: Similar to kitchen applications, undermount sink adhesives are also ideal for bathroom sinks, where aesthetics and moisture resistance are crucial.
- Repairing Loose Sinks: In cases where an undermount sink has become loose over time, these adhesives can be used for repairs, restoring the sink’s stability without the need for a full replacement.
- Sealing Gaps: Undermount sink adhesives can also be applied to seal any gaps between the sink and countertop to prevent water infiltration, which can lead to mold and damage.
- Countertop Material Compatibility: These adhesives are formulated to work well with various countertop materials, including granite, quartz, and solid surface, ensuring a strong bond regardless of the surface used.
Kitchen sink installations benefit greatly from undermount sink adhesives as they provide a clean aesthetic while ensuring the sink is securely held in place. The adhesive helps to absorb vibrations and movements, which is particularly important in high-traffic kitchen environments.
For bathroom sink installations, using the best undermount sink adhesive is essential to withstand humidity and water exposure, providing durability and preventing damage over time. The adhesive’s moisture resistance ensures a long-lasting bond, which is critical in maintaining the integrity of the sink installation.
When repairing loose sinks, undermount sink adhesives offer a practical solution without the hassle of removing and replacing the entire sink. This application saves time and effort while restoring functionality and appearance.
In addition to securing sinks, the adhesives can effectively seal any gaps that may occur, protecting the underlying surfaces from water damage. This sealing capability is vital to maintaining the longevity of both the sink and the countertop.
Lastly, the compatibility of these adhesives with various countertop materials makes them versatile for different installations, allowing for a solid bond that meets the specific requirements of each type of material used in modern kitchen and bathroom designs.
What Factors Can Affect the Bond Strength of Undermount Sink Adhesives?
Several factors can influence the bond strength of undermount sink adhesives:
- Surface Preparation: The effectiveness of the adhesive largely depends on how well the surfaces are prepared before application. Clean, dry, and smooth surfaces ensure a better bond, as contaminants like dust or grease can weaken adhesion.
- Type of Adhesive: Different adhesives have varying properties, such as flexibility, curing time, and temperature resistance. Selecting the right type, such as silicone or epoxy, is crucial for achieving optimal bond strength in specific environments.
- Environmental Conditions: Temperature and humidity levels during the curing process can significantly impact adhesive performance. High humidity can introduce moisture that interferes with bonding, while extreme temperatures may cause the adhesive to cure improperly.
- Application Technique: The method used to apply the adhesive can affect the bond’s integrity. An even, consistent application ensures that the adhesive fills all gaps and provides a stronger, more uniform bond across the surfaces.
- Load and Stress Factors: The weight of the sink and any additional stress from usage can influence how well the adhesive holds over time. Understanding the load the adhesive will need to support is essential in selecting the appropriate product for the installation.
- Curing Time: Allowing the adhesive sufficient time to cure before subjecting it to stress is vital for achieving the best bond strength. Rushing this process can lead to premature failure of the bond, as the adhesive needs time to reach its maximum strength.
How Do I Properly Apply Undermount Sink Adhesive for the Best Results?
To properly apply undermount sink adhesive for the best results, follow these key steps:
- Surface Preparation: Ensuring the surfaces are clean and dry is vital for optimal adhesion.
- Adhesive Selection: Choosing the right type of adhesive specifically formulated for undermount sinks can significantly impact durability and performance.
- Application Technique: Correctly applying the adhesive in a continuous bead ensures a secure bond between the sink and countertop.
- Curing Time: Allowing the adhesive to cure fully is essential for achieving a strong, lasting hold.
- Final Checks: Conducting a thorough inspection after installation helps identify any potential issues early on.
Surface Preparation: The surfaces of both the sink and the countertop must be thoroughly cleaned to remove any dust, grease, or old adhesive residues. Using a solvent such as denatured alcohol can help ensure that the area is completely devoid of contaminants, which is crucial for the adhesive to bond effectively and prevent future leaks or damage.
Adhesive Selection: The best undermount sink adhesive is typically a silicone or polyurethane-based product designed to withstand moisture and provide a strong bond. Be sure to check for specific features such as flexibility, waterproofing capabilities, and resistance to mold and mildew, as these factors greatly contribute to the longevity of your installation.
Application Technique: When applying the adhesive, use a caulking gun to create a continuous, even bead around the perimeter of the sink’s lip. This ensures maximum contact with the countertop and makes it less likely for gaps to form, which could lead to leaks or sink separation over time.
Curing Time: After placing the sink, it’s critical to allow the adhesive to cure undisturbed for the time specified by the manufacturer, usually ranging from 24 to 72 hours. This waiting period is crucial as it allows the adhesive to fully bond, ensuring a secure installation before any weight or pressure is applied to the sink.
Final Checks: Once the adhesive has cured, check the installation for any gaps or loose areas by gently pressing around the sink’s edges. If any issues are detected, address them immediately to prevent water infiltration or structural weakness, ensuring a long-lasting and functional undermount sink installation.
What Are the Frequent Mistakes to Avoid When Using Undermount Sink Adhesive?
When using undermount sink adhesive, certain frequent mistakes can compromise the installation’s effectiveness and durability.
- Not Cleaning the Surface Properly: Failing to thoroughly clean both the sink and the countertop can prevent proper adhesion. Residues such as dust, grease, or old adhesive can create barriers, leading to poor bonding and potential leaks.
- Ignoring Manufacturer Instructions: Each adhesive may have specific application instructions and curing times that need to be followed. Not adhering to these guidelines can result in inadequate bonding, which could cause the sink to detach over time.
- Applying Excessive Adhesive: Using too much adhesive can lead to overflow when the sink is pressed into place, making a mess and potentially blocking drainage holes. It can also create weak points in the bond, causing issues with stability and support.
- Not Allowing Proper Curing Time: Rushing the installation process by not allowing the adhesive to cure for the recommended time can lead to failure. Patience is essential, as the adhesive needs adequate time to set for a strong bond.
- Neglecting to Use Support During Curing: Failing to provide temporary support for the sink while the adhesive cures can lead to movement, which compromises the bond. Proper support ensures the sink remains in the correct position and maintains alignment during the curing process.
- Not Testing the Bond After Curing: After the adhesive has cured, it’s critical to test the bond before using the sink. This step is often overlooked, but it can save you from future leaks and structural issues by ensuring that the sink is securely attached.
How Do I Maintain an Undermount Sink After Adhesive Application?
Maintaining an undermount sink after adhesive application is crucial for ensuring its longevity and functionality.
- Allow Proper Cure Time: After applying the adhesive, it’s essential to allow sufficient cure time as per the manufacturer’s instructions. This ensures that the adhesive bonds properly, preventing any leaks or damage that could occur from premature use.
- Avoid Excessive Weight: Refrain from placing heavy items in or on the sink immediately after installation. Excessive weight can disrupt the adhesive bond, leading to potential detachment or cracking of the sink.
- Regular Cleaning: Keep the sink clean using non-abrasive cleaners to avoid damaging the adhesive or the sink surface. Regular maintenance will help preserve the integrity of both the adhesive and the sink material.
- Check for Gaps: Periodically inspect the edges of the sink for any visible gaps between the sink and the countertop. If gaps are detected, they should be addressed immediately to prevent moisture from seeping through, which can weaken the adhesive over time.
- Avoid Harsh Chemicals: Steer clear of harsh chemicals or solvents that could degrade the adhesive. Using only gentle, recommended cleaning products will help maintain the bonding and appearance of the sink.
- Monitor Water Drainage: Ensure that water drains properly without pooling around the sink area. Standing water can compromise the adhesive’s bonding capabilities, leading to potential issues with the sink’s installation.