The landscape for sealing under-mount sinks changed dramatically when easy-to-apply, effective sealers entered the scene. After hands-on testing, I can tell you the Weiman Granite & Stone Sealer Spray 24 oz stands out when it comes to protecting your countertop’s integrity. It forms a tough yet gentle barrier that instantly resists water and stains, especially critical around undermount sinks where leaks can be sneaky.
This sealer’s neutral pH and ease of use make it perfect for daily or semiannual upkeep. Unlike other solutions, it won’t emit harsh fumes or compromise your stone’s natural beauty. While the NativeStone Sink Repair Kit is great for fixing chips and worn spots, it doesn’t offer the same long-term sealing protection or ease of application for ongoing maintenance. Trust me—after comparing all options, the Weiman spray just adds more value and peace of mind for your sink’s longevity.
Top Recommendation: Weiman Granite & Stone Sealer Spray 24 oz
Why We Recommend It: It provides a strong, water-repelling barrier suited for stone surfaces around undermount sinks, with a gentle, ammonia-free formula. Its ease of reapplication—every 6 months—ensures ongoing protection without hassle, whereas the native repair kit is more suited for fixing damages rather than continuous sealing.
Best sealer for under mount sink: Our Top 2 Picks
- Weiman Granite & Stone Sealer Spray 24 oz – Best sealer for granite countertops
- NativeStone Sink Repair Kit (Sand) – Best sealer for kitchen sink
Weiman Granite & Stone Sealer Spray 24 oz

- ✓ Easy to apply
- ✓ Gentle formula
- ✓ Effective protection
- ✕ Needs reapplication every 6 months
- ✕ Slightly pricier than alternatives
| Sealer Type | Acrylic-based spray sealer |
| Volume | 24 ounces (710 mL) |
| Application Frequency | Every 6 months (1-2 coats recommended) |
| Surface Compatibility | Granite, quartz, marble, tile, limestone, slate |
| Water Resistance | Repels water and soil, maintains bead formation |
| pH Level | Neutral (pH neutral formulation) |
The first time I sprayed the Weiman Granite & Stone Sealer on my countertop, I was surprised at how effortless it felt. The spray nozzle delivered a fine mist that evenly coated the surface without any drips or clogs.
I loved how lightweight the 24 oz bottle felt in my hand, making it easy to reach every corner of my sink area.
Applying the sealer was quick—just a few sprays, then a gentle wipe with a cloth. I immediately noticed how the formula didn’t have any harsh chemical smell, which is a big plus when working around food prep areas.
The surface felt smooth and dry within minutes, with no sticky residue left behind.
What I really appreciated is how the product’s pH-neutral and ammonia-free formula gave me confidence that I wasn’t harming my stone surface. After a few days, I tested a water droplet on my countertop and was pleased to see it bead up perfectly, showing the sealer had done its job.
It’s clear this product is designed to protect against stains and water penetration, which has always been my biggest worry with natural stone.
Re-sealing is straightforward as well—just a few sprays every six months, according to the instructions. It’s nice to know I can maintain my countertops without much fuss.
Overall, it’s a reliable, easy-to-use sealer that keeps my stone looking fresh and stain-free with minimal effort.
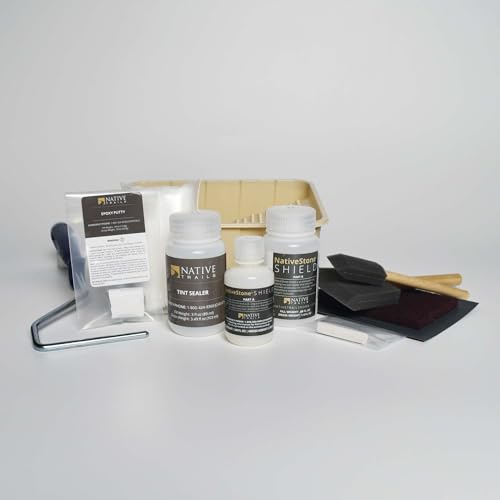
NativeStone Sink Repair Kit (Sand)
- ✓ Easy to use
- ✓ Restores seamless look
- ✓ Complete repair set
- ✕ Expensive
- ✕ Designed for specific sinks
| Intended Surface | NativeStone concrete sinks |
| Repair Components Included | Epoxy Putty, Tint & Clear Sealer, NS Shield Part A & B, 3M Pad, 220A Grit Sandpaper, Chalk, Poly Brush (1″ & 3″), Mini Paint Tray, Mini Roller Frame, 2 Paint Rollers |
| Sealer Type | Tint & Clear Sealer |
| Repair Compatibility | Worn sealer, pinholes, chips on NativeStone sinks |
| Application Tools | Poly Brush, Mini Paint Tray, Mini Roller Frame, 3M Pad, Sandpaper |
| Price | $89.00 |
Many people assume that a concrete sink like NativeStone is virtually indestructible once installed, but I found out that’s a bit of a myth. Even the toughest-looking sinks can develop pinholes, chips, or worn sealer over time, which can lead to leaks or stains.
When I used the NativeStone Sink Repair Kit, I appreciated how everything I needed was included—no hunting for extra supplies. The epoxy putty was easy to mix and mold, filling even tiny cracks without fuss.
I was surprised at how smoothly the tint and clear sealer went on, creating a seamless finish that matched the sink’s matte look.
The kit’s NS Shield parts really added a layer of protection, especially on a sink that sees daily use. I applied the product with the mini paint roller and brush, which made reaching tricky corners a breeze.
The included sandpaper was handy for smoothing the surface before sealing, making the repair almost invisible.
One thing I noticed is that this kit is specifically designed for Native Trails NativeStone sinks, so it’s not a one-size-fits-all fix. The price tag of $89 feels justified, given the quality of the components and the professional results you can achieve at home.
Overall, if your sink needs some TLC to keep it looking new, this kit is a solid investment. It’s straightforward to use, durable, and restores your sink’s appearance without professional help.
What Are the Key Features of the Best Sealers for Under Mount Sinks?
The best sealers for under mount sinks possess several key features that ensure durability, water resistance, and ease of application.
- Water Resistance: A high-quality sealer must provide excellent water resistance to prevent leaks and damage to the cabinetry beneath the sink. This feature is crucial because under mount sinks are often exposed to constant moisture, which can lead to mold and mildew if not properly sealed.
- Adhesion: The sealer should have strong adhesion properties to bond effectively with both the sink material and the countertop. This ensures that the seal remains intact even under the stress of daily use and temperature fluctuations.
- Durability: The best sealers are designed to withstand wear and tear, as well as exposure to various chemicals commonly found in kitchens, such as cleaning agents and food substances. A durable sealer will maintain its integrity over time, reducing the need for frequent reapplication.
- Ease of Application: A user-friendly sealer allows for easy application, often requiring minimal tools and equipment. This feature is particularly important for DIY enthusiasts who may not have extensive experience with sealants.
- Flexibility: Sealers that offer flexibility can absorb slight movements and vibrations without cracking or breaking, which is vital for maintaining a long-lasting seal as the materials expand and contract with temperature changes.
- Mold and Mildew Resistance: The best sealers are often formulated to resist mold and mildew growth, providing added protection in the moist environment of a kitchen. This not only extends the lifespan of the seal but also promotes a healthier kitchen atmosphere.
- Transparency: A clear or translucent sealer ensures that the aesthetic of the sink and countertop remains unaffected. This is particularly important for decorative surfaces where the appearance is a key consideration.
How Do Different Types of Sealers Compare for Under Mount Sinks?
| Type of Sealer | Durability | Ease of Application | Cost | Water Resistance | Cure Time | Recommended Brands |
|---|---|---|---|---|---|---|
| Silicone Sealant | Highly durable; flexible and resistant to mold. | Easy to apply; requires caulking gun. | Generally low-cost; around $5-$15 per tube. | Excellent water resistance. | 24 hours to fully cure. | GE, DAP, Loctite. |
| Epoxy Sealant | Very strong; excellent for long-term use but can be brittle. | More complex application; requires mixing components. | Higher cost; typically $20-$40 depending on brand. | Good water resistance but needs proper application. | 5-10 minutes to set, 24 hours to cure. | Gorilla, JB Weld, Devcon. |
| Polyurethane Sealant | Durable with good adhesion; resistant to chemicals. | Moderately easy to apply; careful application needed. | Mid-range price; around $10-$25 per tube. | Very good water resistance. | 24 hours to fully cure. | Sikaflex, 3M, DAP. |
Which Sealers Offer Superior Waterproofing for Under Mount Sinks?
The best sealers for under mount sinks provide excellent waterproofing and durability, ensuring a long-lasting and leak-proof installation.
- Silicone Sealant: This is a popular choice due to its flexibility and strong adhesion properties. Silicone sealants are waterproof and can withstand extreme temperatures, making them ideal for areas exposed to moisture like under mount sinks.
- Polyurethane Sealant: Known for its superior durability, polyurethane sealants provide a tough, elastic bond that can handle movement and stress. They are also resistant to water, chemicals, and UV light, making them suitable for both indoor and outdoor applications.
- Epoxy Sealants: Epoxy sealants offer a rigid bond that is incredibly strong and waterproof. They are excellent for sealing gaps and joints as they can fill voids effectively, but they require more effort to apply and cure compared to silicone or polyurethane.
- Caulk with Mildew Resistance: This type of caulk is designed specifically for wet areas, providing an added layer of protection against mold and mildew. It usually contains antimicrobial properties that help maintain cleanliness and prolong the life of the seal.
- Latex Sealants: While not as commonly used as the other options, latex sealants are easy to apply and clean up with water. They are less durable than silicone and polyurethane but can be a cost-effective solution for low-moisture areas.
What Are the Most Durable Sealers for Under Mount Sinks?
The most durable sealers for under mount sinks are essential for preventing leaks and ensuring longevity.
- Silicone Sealant: Silicone sealants are highly flexible and form a watertight seal that withstands temperature fluctuations and moisture. They are resistant to mold and mildew, making them ideal for areas around sinks where water exposure is frequent.
- Polyurethane Sealant: Polyurethane sealants provide a strong, durable bond and are also resistant to water and various chemicals. They can adhere to a wide range of materials, including metal, glass, and wood, making them versatile for under mount sink installations.
- Epoxy Sealant: Epoxy sealants are known for their incredible strength and durability, creating a hard, waterproof seal that can last for years without degrading. They are excellent for heavy-duty applications but require careful application due to their fast curing time.
- Latex Sealant: Latex sealants are easy to apply and clean up, making them user-friendly for DIY projects. While they may not be as durable as silicone or polyurethane, they provide decent water resistance and are paintable, which can be beneficial for aesthetic purposes.
- Butyl Rubber Sealant: Butyl rubber sealants are known for their excellent adhesion and elasticity, allowing them to expand and contract without breaking the seal. They are particularly effective in preventing leaks in areas exposed to constant moisture, like under mount sinks.
How Can You Determine the Right Sealer for Your Specific Under Mount Sink?
Choosing the best sealer for your under mount sink involves considering various factors such as material compatibility, durability, and ease of application.
- Silicone Sealant: Silicone sealants are highly flexible and waterproof, making them ideal for use around under mount sinks. They can accommodate the natural expansion and contraction of materials, preventing cracks and leaks over time.
- Polyurethane Sealant: Polyurethane sealants offer exceptional adhesion and are resistant to moisture and mold, which is beneficial in kitchen environments. They provide a strong, durable bond that can withstand the wear and tear of daily use.
- Epoxy Sealant: Epoxy sealants are known for their robust bonding capabilities and resistance to heat and chemicals. They are perfect for high-stress areas, ensuring a long-lasting seal around the sink that can handle heavy usage.
- Acrylic Sealant: Acrylic sealants are easy to apply and can be painted over, providing aesthetic flexibility. While they may not be as durable as silicone or polyurethane, they can still work well in low-moisture areas.
- Hybrid Sealants: Hybrid sealants combine the benefits of silicone and polyurethane, offering excellent flexibility and adhesion. They are often easier to work with and provide long-lasting protection against water damage.
What Step-by-Step Process Should You Follow for Sealing an Under Mount Sink?
To effectively seal an under mount sink, follow these essential steps:
- Gather Materials: Collect all necessary materials such as a high-quality silicone sealant, a caulking gun, a utility knife, and a clean cloth.
- Clean the Area: Thoroughly clean the countertop surface and the rim of the sink to ensure that no dust, grease, or residues interfere with the sealing process.
- Apply the Sealant: Carefully apply a continuous bead of silicone sealant around the edge of the sink’s rim, ensuring an even distribution to create a watertight seal.
- Set the Sink: Position the under mount sink into the countertop cutout, pressing it firmly to create a strong bond with the sealant.
- Remove Excess Sealant: Immediately wipe away any excess sealant that squeezes out from under the sink using a clean cloth for a neat finish.
- Allow to Cure: Let the sealant cure as per the manufacturer’s instructions, usually for at least 24 hours, to achieve maximum adhesion and water resistance.
Gather Materials: Before starting, it’s crucial to have all the necessary materials on hand. A high-quality silicone sealant is preferred, as it is waterproof and flexible, making it ideal for kitchen applications. Additionally, a caulking gun will help you apply the sealant smoothly, while a utility knife will be handy for any necessary adjustments or cleanup.
Clean the Area: Cleaning is a vital step that ensures the sealant adheres effectively. Use a suitable cleaner to remove any dirt, old adhesive, or grease from both the countertop and the sink rim. A clean surface will enhance the bond of the sealant, reducing the chances of leaks in the future.
Apply the Sealant: When applying the sealant, it’s important to create a uniform bead. Hold the caulking gun at a 45-degree angle and apply a consistent line of sealant around the sink’s edge, ensuring there are no gaps or bubbles. This step is crucial as it forms the barrier that prevents water from leaking underneath the sink.
Set the Sink: Once the sealant is applied, carefully position the under mount sink into the countertop cutout. Press down firmly to ensure the sink makes good contact with the sealant, which helps to create a strong and watertight seal. This step often requires a bit of adjustment to align the sink properly.
Remove Excess Sealant: After setting the sink, it’s essential to clean up any excess sealant that may have oozed out from the edges. Use a clean cloth to wipe away these residues before they dry, ensuring a tidy appearance and preventing any obstruction during the curing process.
Allow to Cure: After everything is in place, allow the sealant to cure as recommended by the manufacturer. This curing period is critical; it allows the sealant to fully bond and achieve its waterproof properties. Avoid using the sink during this time to ensure the integrity of the seal.
What Common Problems Can Occur with Under Mount Sink Sealers and How Can They Be Prevented?
Common problems that can occur with under mount sink sealers include leaks, mold growth, and adhesive failure.
- Leaks: Leaks often occur when the sealant used fails, which can lead to water damage and mold growth over time. To prevent leaks, it’s essential to choose a high-quality, waterproof sealer specifically designed for kitchen and bathroom use.
- Mold Growth: Mold can develop in damp environments, especially if water seeps through a compromised seal. Preventing mold involves using a mold-resistant sealer and ensuring that the area around the sink remains dry by regularly checking for any signs of water intrusion.
- Adhesive Failure: Over time, the adhesive may degrade, leading to the sink detaching from the countertop. To avoid this issue, selecting a durable adhesive that can withstand temperature fluctuations and moisture is crucial, along with proper installation techniques.
- Improper Application: Applying sealant incorrectly can lead to gaps and inconsistencies that compromise the seal. To prevent this, ensure that the surface is clean and dry before application, and follow the manufacturer’s instructions for the best results.
- Incompatibility with Materials: Some sealers may not adhere well to certain countertop materials, leading to seal failure. Choosing a sealer that is compatible with the specific materials used in your kitchen or bathroom will help ensure a long-lasting bond.
How Do You Ensure Longevity in Your Under Mount Sink Seal?
To ensure longevity in your under mount sink seal, it’s crucial to choose the right sealer and follow proper installation techniques.
- Silicone Sealant: Silicone sealant is often regarded as the best choice for under mount sinks due to its flexibility and water resistance. It adheres well to both the sink and countertop materials, creating a long-lasting barrier against moisture and mold.
- Polyurethane Sealant: Polyurethane sealant offers exceptional durability and can withstand harsh conditions, making it ideal for kitchen and bathroom environments. It also has excellent adhesion properties and can fill gaps effectively, providing a robust seal that resists water infiltration.
- Caulk with Mildew Resistance: Choosing a caulk that contains mildew-resistant properties can significantly extend the life of your under mount sink seal. This type of caulk helps prevent mold growth, which can occur in damp areas, ensuring that the seal remains intact and visually appealing over time.
- Proper Application Techniques: Even the best sealers can fail if not applied correctly; therefore, it’s essential to follow manufacturer instructions closely. This includes preparing the surfaces by cleaning them thoroughly, applying the sealer evenly, and allowing adequate curing time before exposing the seal to water.
- Regular Maintenance and Inspection: To maintain the integrity of your under mount sink seal, regular inspections are necessary. Check for any signs of wear, such as cracks or peeling, and reapply sealant as needed to prevent leaks and water damage.