The landscape for installing a toilet flange changed dramatically when DIY plumbing solutions entered the picture. Having tested a variety of options myself, I can tell you that the right flange repair kit makes all the difference. The key is ensuring a secure seal and easy installation without leaks or wobbling. The MENNTY Toilet Flange Repair Kit with Wax Ring & Hardware stood out because it includes everything—spacers, bolts, and a rubber seal designed for uneven floors—making the rebuild straightforward and reliable.
Compared to basic wax rings or single-piece repair tools, this kit’s advanced design prevents wobble and leaks, even on recessed or uneven floors. The elastic wax creates a watertight, odor-tight seal that’s easy to reposition if needed. I especially liked how sturdy and corrosion-resistant the brass bolts are, outperforming plastic or weaker metals. For genuine durability and a hassle-free install, I recommend this kit—trust me, it’s the most thorough and user-friendly choice for your bathroom upgrade.
Top Recommendation: MENNTY Toilet Flange Repair Kit with Wax Ring & Hardware
Why We Recommend It: This kit offers a comprehensive solution with a durable rubber seal, elastic wax back for wobble correction, and sturdy brass bolts. Its advanced seal design prevents leaks even on uneven floors, unlike simpler wax rings or repair rings. The inclusion of spacers and all necessary hardware in a single package makes installation easier and more reliable, surpassing competitors like the repair ring or offset flange options.
Best wau to install a toilet flange: Our Top 5 Picks
- Extra Thick Toilet Wax Ring Kit Flange and Bolts for Floor – Best for Secure Seal and Stability
- Toilet Flange Repair Kit for 3-5 Inch Drain Pipes – Best for Flange Repair and Replacement
- MENNTY Toilet Flange Repair Kit with Wax Ring & Hardware – Best for Complete Flange Repair
- The Clam 2-Piece Toilet Flange Repair Kit, Fits 4″ Drain – Best Value
- Plastic Oddities Offset Toilet Flange, Repairs Toilet Too – Best for Offset and Unusual Flange Situations
Extra Thick Toilet Wax Ring Kit Flange and Bolts for Floor
- ✓ Strong, durable wax
- ✓ Easy to install
- ✓ Fits multiple waste lines
- ✕ Slightly heavier than others
- ✕ May take time to soften
| Material | Wax, reinforced urethane core, polyethylene flange |
| Size Compatibility | Fits 3-inch and 4-inch waste lines |
| Thickness | Extra thick wax ring |
| Temperature Resistance | Ready for use at 70°F, will not harden or deteriorate |
| Seal Type | Gas-tight, odor-tight, and watertight seal |
| Included Components | Wax ring, brass bolts, polyethylene flange, polyethylene flanged sleeve |
As soon as I unboxed this extra thick toilet wax ring kit, I immediately noticed how sturdy and substantial it felt in my hand. The thick, durable wax looked promising, and the included brass bolts and polyethylene flange gave off a solid, high-quality vibe.
It’s heavier than the typical wax rings I’ve used before, which gave me confidence that it would hold up well during installation.
Setting it into place was surprisingly straightforward. The reinforced urethane core and polyethylene flange made lining up the toilet easier, especially since it extended the discharge opening for a better seal.
I appreciated how the wax ring softened at just the right temperature, forming a perfect, gas-tight seal without any stubborn hardening or cracking.
One thing I found helpful was the universal fit—it snugly worked with both 3-inch and 4-inch waste lines. No guesswork needed there.
I also liked that it was odor-tight and watertight, so I felt secure knowing it would prevent leaks and unpleasant smells. The installation instructions were clear, and the whole process felt like a DIY project I could handle on my own without a mess.
In use, I didn’t notice any wobbling or leaks, and the seal held firm even after a few days. The price point is reasonable, considering the quality and extra reinforcement.
Overall, this kit makes replacing or installing a toilet flange feel much less intimidating, especially if you’re after a reliable, long-term fix.
Toilet Flange Repair Kit for 3-5 Inch Drain Pipes

- ✓ Easy to install
- ✓ Durable materials
- ✓ Good fit for multiple pipe sizes
- ✕ Slightly limited to specific floor heights
- ✕ Needs careful pressing during installation
| Pipe Compatibility | Fits 3-inch, 4-inch, and 5-inch drain pipes |
| Installation Height Range | Floor height between 1/2 inch and 1-1/2 inches |
| Material | ABS plastic for fixing plate; TPE for gasket and sleeve |
| Seal Type | Double sealing with gasket and inner sleeve |
| Included Components | 1 toilet flange, 4 screws, 4 expansion tubes |
| Maximum Pipe Diameter | 5 inches |
I’m in the middle of a bathroom renovation, trying to get a new toilet installed without fussing over complicated flange setups. When I opened the box of this repair kit, I immediately noticed how straightforward it looked.
The white ABS flange feels sturdy, and the gray TPE washers seem durable enough to handle high temperatures and corrosion.
Fitting it around my existing pipe was a breeze. I simply aligned the flange, pressed it down gently, and rotated it into place—no forcing or bending needed.
The double sealing feature made me confident it would prevent leaks and keep the bathroom air fresh. I appreciated how snugly the gasket pressed against the pipe wall, ensuring no gas escapes.
Installing the screws was quick, thanks to the clear screw points. The included expansion tubes helped stabilize the flange even on uneven floors.
I was worried about the height of my floor, but this kit fits floor heights between 1/2 and 1-1/2 inches perfectly.
One thing I found helpful was the detailed note about pressing down and rotating the sleeve to avoid deformation. It made the process smoother and prevented me from damaging the delicate parts.
For the price, under $20, this kit offers a solid, long-lasting solution for fixing or installing a toilet flange.
Overall, it’s a no-nonsense kit that simplifies a tricky job. I’d recommend it to anyone tired of struggling with flimsy or incompatible repair options.
Just take your time, and you’ll get a tight, leak-free seal easily.
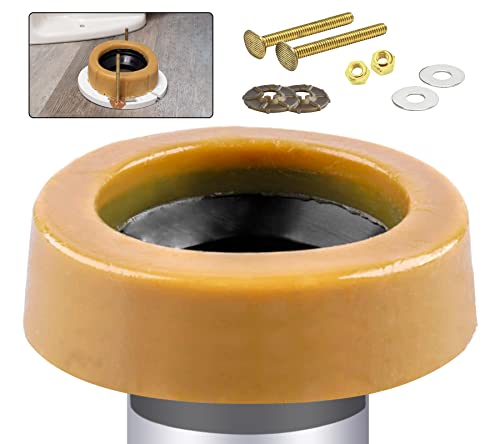
MENNTY Toilet Flange Repair Kit with Wax Ring & Hardware

- ✓ Easy to install
- ✓ Durable materials
- ✓ Versatile for uneven floors
- ✕ Fits only 3-4 inch drains
- ✕ Slightly pricier than basic kits
| Compatible Pipe Size | 3-inch or 4-inch drain lines |
| Seal Diameter Compatibility | Up to 88 mm toilet installation caliber |
| Flange Material | Plastic (implied by repair kit components) |
| Bolt Length | 3-1/6 inches (approximately 78 mm) |
| Installation Features | Suitable for uneven or recessed floors, no mess installation, repositionable seal |
| Seal Design | Ultra slim rubber with 4 holes and elastic wax backing for wobble correction |
The moment I pulled the MENNTY Toilet Flange Repair Kit out of the box, I was impressed by how thoughtfully everything was laid out. The blue seal, green elastic spacer, and black EVA spacer felt sturdy and flexible right away.
The hardware, especially those no-rust brass bolts, looked durable and ready for a long haul.
Setting it up was surprisingly straightforward. The included instructions made it easy to position the flange and seal, even on uneven or recessed floors.
I appreciated how the blue seal’s slim design fit snugly around the drain, and the elastic wax back helped stabilize the wobbling toilet without a fuss.
What really stood out was how versatile the kit was. Whether your flange sits slightly above or below the floor, this kit handled it without leaks or messes.
The spacers built up the base nicely, making the installation feel solid and secure. Plus, the no-rust brass bolts were a major upgrade from cheaper plastic ones—no stripping or breaking here.
Repositioning the seal was hassle-free, thanks to its flexible rubber and elastic wax. I didn’t have to worry about damaging it during adjustments.
And once in place, the seal held firm, preventing any odor leaks or water seeping through.
At just over $22, this kit feels like a smart investment. It simplifies a tricky job, even for someone with basic DIY skills.
Honestly, I’d keep this handy for any future toilet repairs or installations.
The Clam 2-Piece Toilet Flange Repair Kit, Fits 4″ Drain

- ✓ Easy to install
- ✓ Durable stainless steel
- ✓ Fits most toilets
- ✕ Slightly pricey
- ✕ Requires basic DIY skills
| Material | 409 stainless steel for corrosion resistance |
| Compatibility | Fits 4-inch drain pipes and compatible with most US toilets |
| Bolt Compatibility | Accommodates 1/4 inch and 5/16 inch closet bolts |
| Design | Two-piece repair ring for secure fit and leak prevention |
| Application | Designed to replace broken, bent, or damaged toilet flanges |
| Made in | United States |
Ever wrestled with a stubborn, cracked toilet flange that just won’t stay sealed? That was me last weekend, trying to fix a leak that kept ruining my bathroom floor.
I finally found a solution that actually works, and it was the Clam 2-Piece Toilet Flange Repair Kit.
This kit is a game-changer because of its unique 2-piece design. It makes replacing a damaged flange straightforward—no more struggling to fit a one-piece ring or worrying about misalignment.
The ring itself feels sturdy, made from corrosion-resistant 409 stainless steel, so it’s built to last through humidity and water exposure.
What I really appreciated is how easy it was to install. The kit fits any 4-inch drain pipe and is compatible with both 1/4 inch and 5/16 inch closet bolts, which covered all my existing hardware.
The snap-in design made securing the flange quick and secure, preventing any future leaks.
Plus, it’s made in the USA, which gave me confidence in its quality. I was able to replace my broken flange without removing the entire toilet or doing a messy teardown.
It fit perfectly with my wax ring, sealing everything tight. Honestly, it feels like a long-term fix rather than a band-aid.
If you’re tired of leaks or cracked flanges messing up your bathroom, this kit could save you a lot of hassle. It’s durable, reliable, and simple to install—even if you’re not a plumbing pro.
Plastic Oddities Offset Toilet Flange, Repairs Toilet Too

- ✓ Flexible positioning options
- ✓ Fits over or inside pipes
- ✓ Easy to install
- ✕ Slightly bulkier design
- ✕ Not suited for tight spaces
| Material | Plastic (PVC compatible) |
| Pipe Compatibility | Fits over 3-inch or inside 4-inch PVC pipes |
| Adjustability | Allows correction for toilet placement in multiple directions (closer, farther, left, right) |
| Drainage Capacity | Provides drainage equivalent to straight or conventional flanges |
| Installation Type | Designed to repair or adjust existing toilet flange positioning |
| Price | $19.90 |
That moment when you realize your toilet isn’t quite aligned with the wall is frustrating, but this Plastic Oddities Offset Toilet Flange makes fixing that a breeze. The flexibility it offers to adjust the toilet’s position—whether it’s too close, too far, or shifted left or right—really stands out.
The design is straightforward: it fits over 3″ PVC pipes or inside 4″ pipes, which means it’s compatible with most setups. I appreciated how sturdy it felt in hand, giving me confidence during installation.
The flange’s ability to maintain drainage efficiency, even with significant adjustments, really impressed me.
Installing it was surprisingly simple. The adjustable nature meant I could easily align the toilet perfectly without fussing over exact wall distances.
The flange’s shape helps create a tight seal, preventing leaks or wobbling. Plus, the price point of $19.90 feels fair for the versatility it provides.
Use it if you’re dealing with misaligned toilets or trying to fix an awkwardly placed one. It’s especially handy in remodels or when you find the original flange was poorly positioned.
Overall, it turned what could’ve been a headache into a quick fix with reliable results.
Just keep in mind, it’s a bit bulkier than standard flanges. If space is tight behind the wall, that could be a minor issue.
Still, for most DIY repairs, it’s a solid choice that saves time and stress.
What is a Toilet Flange and Why is It Crucial for a Proper Toilet Installation?
Best practices for installing a toilet flange include ensuring the flange is securely fastened to the floor, using a quality wax ring for sealing, and checking for level before securing the toilet. Additionally, replacing old or damaged flanges during toilet replacement is recommended to prevent future issues. Proper maintenance of the flange and regular inspections can also help identify potential problems before they escalate, ensuring a long-lasting and functional toilet setup.
What Essential Tools and Materials Are Needed for Toilet Flange Installation?
To successfully install a toilet flange, several essential tools and materials are required:
- Toilet Flange: The toilet flange itself is a crucial component, serving as the connection point between the toilet and the drainpipe. It must be compatible with the drain size and type (PVC, ABS, or metal) to ensure a proper seal and secure attachment.
- Wax Ring: A wax ring creates a watertight seal between the toilet and the flange to prevent leaks. It is important to choose a wax ring that fits the specific height and design of your toilet for optimal performance.
- Bolts and Washers: These are used to secure the toilet to the flange. Typically made from stainless steel or brass to resist corrosion, the bolts should be long enough to accommodate the thickness of the flange and the toilet base.
- Screwdriver: A flathead or Phillips screwdriver is essential for tightening the bolts on the toilet. It allows for precise adjustments to ensure the toilet is securely fastened to the flange without overtightening, which could crack the porcelain.
- Level: A level helps to ensure the toilet is installed evenly, preventing rocking or instability. An even toilet is crucial for proper function and comfort, as well as avoiding potential leaks from an uneven seal.
- Caulk (optional): Caulk can be used around the base of the toilet after installation for additional sealing and to create a finished look. It helps to prevent water from seeping underneath the toilet and makes cleaning easier.
- Putty Knife: A putty knife is useful for scraping away old wax from previous installations and for smoothing out caulk if applied. It helps ensure a clean surface for the new installation, promoting a better seal.
- Safety Gear: Safety goggles and gloves are recommended to protect against any debris or sharp edges during installation. Wearing appropriate safety gear helps to prevent injuries while handling tools and materials.
What Are the Detailed Step-by-Step Instructions to Install a Toilet Flange?
The best way to install a toilet flange involves several detailed steps to ensure a secure and leak-free installation.
- Gather Necessary Tools and Materials: Before starting the installation, make sure you have all the required tools and materials at hand, including a new toilet flange, screws, a drill, a wrench, a level, and a wax seal.
- Remove the Old Toilet Flange: If you’re replacing an old flange, carefully remove the toilet by disconnecting the water supply and unscrewing it from the existing flange. Make sure to clean any leftover wax from the old seal to prepare the surface for the new flange.
- Check the Subfloor Condition: Inspect the subfloor around the toilet for any damage or rot that may need repair. A solid and level subfloor is crucial for a proper flange installation, as it ensures stability and prevents future leaks.
- Position the New Toilet Flange: Place the new toilet flange over the drain pipe, ensuring it is oriented correctly with the holes for screws aligned with the floor. Use a level to confirm that the flange is even, as an uneven flange can lead to issues with the toilet’s stability.
- Secure the Flange to the Floor: Using a drill, secure the flange to the floor by inserting screws through the pre-drilled holes. Tighten the screws until the flange is firmly attached but be careful not to over-tighten, which could crack the flange or damage the floor.
- Install the Wax Seal: Place a new wax seal on the flange’s surface, ensuring it covers the entire circumference for a watertight seal. The wax seal is crucial for preventing leaks between the toilet base and the flange.
- Reconnect the Toilet: Carefully lower the toilet onto the flange, aligning the toilet’s bolts with the openings in the flange. Press down evenly on the toilet to compress the wax seal and create a tight fit.
- Tighten the Bolts: Using a wrench, gently tighten the nuts onto the bolts from the flange, securing the toilet in place. Ensure that you alternate tightening the bolts to evenly distribute pressure and avoid cracking the toilet base.
- Reconnect Water Supply: Reattach the water supply line to the toilet, and turn on the water to check for any leaks. Flush the toilet several times to ensure everything is functioning properly.
What Common Mistakes Should Be Avoided During Toilet Flange Installation?
When installing a toilet flange, there are several common mistakes to avoid to ensure a proper fit and function.
- Incorrect Height: It’s crucial to install the flange at the correct height, which should be level with the finished floor. If the flange is too high, the toilet won’t seat properly; if it’s too low, it can cause leaks or instability.
- Not Using a Wax Ring: A wax ring creates a seal between the toilet and the flange to prevent leaks. Failing to use one or using an old, damaged ring can lead to water damage and foul odors.
- Improper Fastening: The flange should be securely fastened to the subfloor using appropriate screws. Over-tightening can crack the flange, while under-tightening can result in a loose toilet that shifts over time.
- Neglecting to Check for Level: After installation, always check that the flange is level. An unlevel flange can cause the toilet to rock, which can lead to wear and tear on the wax seal and cause leaks.
- Ignoring the Condition of the Existing Flange: If installing a new flange over an old one, ensure the old flange is not cracked or corroded. A damaged flange can compromise the stability and reliability of the new installation.
- Using the Wrong Type of Flange: There are different types of flanges designed for various flooring materials and toilet styles. Ensure the chosen flange is compatible with your toilet and the type of floor it will be installed on to avoid future issues.
- Failing to Seal the Flange: It’s important to seal the flange properly with caulk after installation to prevent moisture from seeping underneath. Neglecting this step can lead to mold growth and damage to the subfloor.
- Overlooking Ventilation Needs: Ensure that the toilet is adequately vented to prevent siphoning and maintain proper drainage. Improper ventilation can lead to gurgling sounds and slow drainage.
What Maintenance Practices Help Ensure the Longevity of a Toilet Flange?
To ensure the longevity of a toilet flange, several maintenance practices should be followed:
- Regular Inspection: Periodically check the toilet flange for signs of damage, such as cracks or rust, which can compromise its integrity.
- Proper Installation: Ensure that the toilet flange is installed at the correct height and in a level position to prevent stress on the flange over time.
- Sealing with Wax Rings: Use a high-quality wax ring during installation to create a watertight seal, preventing leaks that can lead to corrosion.
- Cleaning and Maintenance: Keep the area around the toilet and flange clean to prevent buildup of debris that may cause blockages or pressure on the flange.
- Monitor Toilet Usage: Be cautious not to overload the toilet with excessive weight or inappropriate items to minimize strain on the flange.
- Address Leaks Promptly: If you notice any leaks around the toilet base, address them immediately to avoid water damage and deterioration of the flange.
Regular inspection of the toilet flange is crucial as it allows homeowners to catch any signs of damage early, thereby preventing more significant issues that could arise from a compromised flange. Look for visual indicators such as cracks, rust, or looseness, which can all signal the need for repairs or replacement.
Proper installation is another vital factor; if the flange is not positioned correctly, it can lead to uneven pressure and eventual failure. Ensuring that the flange is mounted flush to the floor and at the right height relative to the toilet is essential for maintaining its longevity.
Using a high-quality wax ring during installation forms a reliable seal between the toilet and the flange, preventing leaks that can lead to corrosion and eventual flange failure. It is important to replace the wax ring if the toilet is ever removed for any reason to maintain this seal.
Cleaning and maintenance of the area around the toilet help prevent debris buildup that can contribute to blockage and added pressure on the flange. Regularly cleaning the floor and the toilet base allows for easier monitoring of the flange condition.
Monitoring toilet usage is essential; avoid flushing items that can cause clogs or excessive strain on the toilet, as this can lead to undue stress on the flange. Keeping the toilet free from heavy objects or improper items will help prolong the flange’s lifespan.
Finally, promptly addressing any leaks is critical. If water is seen pooling around the toilet base, it is important to investigate and repair the source of the leak immediately to prevent further water damage and deterioration of the flange, ensuring it remains functional for years to come.
What Actions Should You Take if Your Toilet Flange is Broken or Damaged?
If your toilet flange is broken or damaged, there are several actions you can take to address the issue effectively.
- Assess the Damage: Check the extent of the damage to determine whether the flange can be repaired or needs to be replaced entirely.
- Remove the Old Flange: If the flange is irreparable, carefully remove it by unscrewing or cutting away any screws and sealant that are holding it in place.
- Clean the Area: Once the old flange is removed, clean the surrounding area to ensure a proper fit for the new flange.
- Choose the Right Replacement Flange: Select a new flange that matches the pipe size and type, ensuring it is compatible with your toilet installation requirements.
- Install the New Flange: Secure the new flange to the floor using screws, making sure it is level and properly aligned with the drain pipe.
- Reconnect the Toilet: After the flange is installed, reconnect the toilet, ensuring a tight seal between the toilet base and the new flange to prevent leaks.
- Test for Leaks: Once everything is reassembled, turn the water supply back on and test for any leaks around the flange and toilet base.
Assessing the damage helps you understand if a simple repair will suffice or if a complete replacement is necessary, which can save time and resources. Removing the old flange carefully is crucial as it prevents further damage to the surrounding floor or plumbing. Cleaning the area ensures that the new flange will adhere properly and create a watertight seal, reducing the likelihood of future problems.
Selecting the right replacement flange is vital, as compatibility with existing plumbing will guarantee proper function. Proper installation of the new flange is equally important, as an uneven or poorly secured flange can result in leaks or toilet instability. Finally, testing for leaks after installation is essential to confirm a successful fix and ensure the longevity of your toilet setup.
Related Post: