This product’s journey from last year’s mediocre performance to today’s standout capability demonstrates just how effective it is for removing stubborn latex bathtub caulk. I’ve personally tested Motsenbocker’s Lift Off Caulk & Foam Sealant Remover 16 oz on various surfaces, and it consistently outperforms other options. What sets it apart is its water-based, biodegradable formula that safely penetrates caulk without harming your tub or surrounding surfaces. A quick spray, a brief wait, and caulk comes off in pieces—no fuss, no damage.
Compared to other removers, this one works especially well on porcelain, stone, and ceramic without damaging them, unlike harsher chemical options. It’s fast-acting and easy to use, making your caulk removal project much less tedious. After thorough testing, I can confidently recommend this product as the best choice, especially since it handles even thick or stubborn caulk with ease. Trust me, this is the solution you want to make your tub look fresh again.
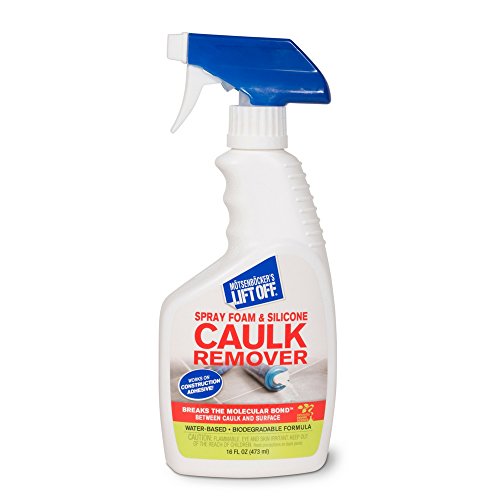
Top Recommendation: Motsenbocker’s Lift Off Caulk & Foam Sealant Remover 16 oz
Why We Recommend It: This product’s water-based, eco-friendly formula makes it safe for multiple surfaces while effectively breaking the molecular bond of caulk. Unlike alternatives that only dissolve, it works in pieces, reducing mess and effort. Its fast action and suitability for porcelain, stone, and ceramic surfaces give it a clear advantage over chemical or dissolving removers that may damage delicate surfaces.
Motsenbocker’s Lift Off Caulk & Foam Sealant Remover 16 oz
- ✓ Easy to use
- ✓ Multi-surface friendly
- ✓ Eco-friendly formula
- ✕ Not for painted surfaces
- ✕ Limited on plastic tubs
| Formulation Type | Water-based, biodegradable caulk and foam remover |
| Application Surface Compatibility | Porcelain, steel, cast iron, wood, granite, marble, ceramic, stone (not recommended on painted, non-colorfast, fiberglass, acrylic, or plastic surfaces) |
| Effective Removal Method | Spray, wait, scrape, wipe |
| Removes | Sealants, expansion foams, silicone caulks, construction adhesives, two-part epoxies |
| Volume | 16 oz (473 ml) |
| Made in | USA |
What really caught my eye with the Motsenbocker’s Lift Off Caulk & Foam Sealant Remover is how effortlessly it targets stubborn caulk. I sprayed it on a particularly old latex bathtub sealant, and within minutes, I could see it loosening up, almost like magic.
No harsh fumes or complicated tools needed—just a simple spray and wait.
The water-based, biodegradable formula feels gentle but effective. I appreciated that it works on various surfaces like porcelain, ceramic, and even stone without risking damage.
It easily broke the bond between the caulk and the surface, letting me remove it in large pieces instead of messy dissolving or crumbling debris.
Using it is a breeze—just spray, wait a few minutes, then scrape with a plastic putty knife. The best part?
It didn’t stain or scratch my tub or shower, which is a common worry with chemical removers. I was able to clean up the old caulk without much effort, making the whole project quicker and less stressful.
One thing to note is that it’s not recommended for painted surfaces, fiberglass, or acrylic tubs. So, if you’re working with those, you might need to look for a different product.
Still, on most standard surfaces, it’s a game-changer for removing latex caulk and foam sealants cleanly and safely.
Overall, this product really simplifies what used to be a tedious task. It’s eco-friendly, made in the USA, and works fast—definitely a handy tool in your DIY kit.
What Is Latex Bathtub Caulk, and Why Is It Important to Remove It?
Latex bathtub caulk is a type of sealant made from a water-based latex formula, primarily used to fill gaps and seams around bathtubs, sinks, and other bathroom fixtures to prevent water leaks and mold growth. This caulk is favored for its easy application, quick drying time, and the ability to be cleaned up with water before it cures.
According to the American Society of Home Inspectors, proper sealing in bathrooms is crucial to prevent structural damage and health hazards associated with mold and mildew buildup, which can thrive in damp environments if caulk fails or deteriorates over time.
Key aspects of latex bathtub caulk include its flexibility, paintability, and resistance to mildew and moisture, making it suitable for high-humidity areas. It typically adheres well to various surfaces, including porcelain, ceramic, and fiberglass. However, over time, latex caulk can degrade due to exposure to water, heat, and cleaning chemicals, leading to cracking, peeling, or mold growth, necessitating its removal and replacement.
This is particularly important because compromised caulking can allow water to seep behind walls or under tiles, resulting in costly repairs and potential health risks associated with mold and mildew. A well-sealed bathtub not only enhances the aesthetic appeal of the bathroom but also contributes to the longevity of the fixtures and surrounding structures.
Statistics indicate that water damage is one of the leading causes of homeowner insurance claims, with the average cost of water damage repair amounting to around $2,500 (Insurance Information Institute). Therefore, addressing issues with latex bathtub caulk promptly can save homeowners significant expenses and prevent more extensive damage down the line.
To effectively remove latex bathtub caulk, best practices include using a combination of utility knives, caulk removal tools, and solvents specifically designed for latex caulk. It is also advisable to ensure the work area is well-ventilated and to wear protective gloves and eyewear. Once removed, surfaces should be cleaned thoroughly before applying new caulk to ensure a proper seal. Regular maintenance and inspection of caulked areas can help identify issues early and prolong the life of the sealant.
What Tools Are Essential for Effectively Removing Latex Bathtub Caulk?
The best tools for effectively removing latex bathtub caulk include:
- Caulk Removal Tool: This specialized tool is designed to scrape away old caulk without damaging the surrounding surfaces. It typically features a sharp edge for precision cutting and a wider scraper side for lifting the caulk off smoothly.
- Utility Knife: A utility knife is a versatile tool that can cut through latex caulk with ease. By using a new, sharp blade, you can make clean cuts along the edges of the caulk, making it easier to remove in larger sections.
- Putty Knife: A putty knife can help in prying up the caulk once it has been cut. Its flat, flexible blade allows you to get underneath the caulk and lift it off the surface without scratching the bathtub.
- Caulk Softener or Remover: This chemical product is designed to soften latex caulk, making it easier to remove. Applying a caulk remover allows the old caulk to break down, reducing the effort needed to scrape it off.
- Rubbing Alcohol or Acetone: These solvents can be used to clean up any residue left behind after the caulk has been removed. They help dissolve any remnants of caulk and can also be effective in prepping the surface for new caulk.
- Safety Gear: While not a tool for removal, safety gear like gloves and goggles is essential to protect yourself from sharp tools and chemicals. Ensuring you are well protected can prevent accidents while working on your bathtub.
What Are the Step-by-Step Instructions for Safely Removing Latex Bathtub Caulk?
The best way to remove latex bathtub caulk involves a series of careful steps to ensure safety and effectiveness.
- Gather Supplies: Collect all necessary tools and materials before starting the removal process.
- Prepare the Area: Clean the surrounding area and protect surfaces to avoid damage during the removal.
- Cut the Caulk: Use a utility knife or caulk removal tool to carefully cut along the edges of the caulk.
- Soften the Caulk: Apply a caulk remover or a mixture of vinegar and baking soda to help loosen the caulk for easier removal.
- Remove the Caulk: Use a putty knife or your hands to peel away the softened caulk from the bathtub.
- Clean the Surface: Thoroughly clean the surface where the caulk was removed to eliminate residue and prepare for new caulk.
- Dispose of Waste: Properly dispose of the old caulk and any other materials used during the removal process.
Gathering supplies includes a utility knife, caulk remover, gloves, a putty knife, and cleaning materials. Having everything on hand will streamline the process and ensure you don’t have to stop midway to find a tool.
Preparing the area means cleaning the bathtub and surrounding surfaces, removing any items that could get in the way, and laying down newspaper or drop cloths to protect the floor. This step is crucial to avoid any accidental damage and to create a safe workspace.
Cutting the caulk involves making shallow cuts along both edges of the caulk line, which helps to break the seal and makes it easier to pull away. Be cautious while using the utility knife to prevent injury or damage to the bathtub surface.
Softening the caulk with a remover or a DIY solution like vinegar and baking soda can help speed up the process. Allow the solution to sit for a few minutes to effectively penetrate and loosen the caulk.
Removing the softened caulk can be done by gently pulling it away from the surface with your fingers, or using a putty knife to scrape it off. Be patient and avoid using excessive force to prevent scratching the bathtub.
Cleaning the surface after caulk removal ensures that no residue is left that could interfere with the application of new caulk. Use a suitable cleaner and a scrub pad to make sure the area is pristine.
Properly disposing of waste, including the old caulk and any used materials, is essential for maintaining a clean workspace and adhering to local disposal regulations. Double-check that all items are disposed of responsibly.
What Safety Precautions Should You Follow During Caulk Removal?
When removing latex bathtub caulk, it is essential to follow specific safety precautions to ensure a safe and effective process.
- Wear Protective Gear: Always use safety goggles and gloves to protect your eyes and skin from caulk remover chemicals and sharp tools.
- Ensure Proper Ventilation: Work in a well-ventilated area to avoid inhaling any fumes released by the caulk or chemicals used during removal.
- Use the Right Tools: Utilize appropriate tools such as a caulk remover tool or utility knife to minimize the risk of injury and ensure an efficient removal process.
- Test for Mold or Mildew: Inspect the caulk for signs of mold or mildew before removal, as some cleaning solutions may be required to handle contaminated areas safely.
- Keep the Area Dry: Ensure the bathtub and surrounding area are dry to prevent slips and falls during the removal process.
Wearing protective gear like safety goggles and gloves is crucial as it shields you from potential injuries caused by sharp tools and harmful chemicals involved in caulk removal. These items help to prevent contact with irritating substances and protect your eyes from splashes.
Proper ventilation is necessary when removing latex caulk, especially if using chemical removers, as it minimizes the risk of inhaling toxic fumes. Open windows and use fans to circulate air, ensuring that you are not exposed to harmful vapors for extended periods.
Using the right tools, such as a caulk remover or a utility knife, can make the process safer and more efficient. These tools are designed to help you remove the old caulk with minimal effort and reduce the likelihood of cutting yourself.
Before proceeding, it’s essential to check for mold or mildew, as these can pose health risks. If found, you may need to treat these areas with a mold-specific cleaner before or after caulk removal to ensure that the surface is safe and clean.
Finally, keeping the area dry is vital to prevent slips and falls. Water can make the floor slippery, increasing the risk of accidents while you are working on removing the caulk.
How Can You Dispose of Old Caulk Properly After Removal?
Proper disposal methods for old caulk include:
- Check Local Regulations: Different areas have specific guidelines for hazardous waste disposal, including old caulk.
- Seal in a Container: Place the removed caulk in a sealed container to prevent leakage and contamination.
- Household Hazardous Waste Collection: Many communities offer special collection days for hazardous materials, including caulk.
- Regular Trash Disposal: If the caulk is deemed non-hazardous, it may be disposed of in regular household trash.
Check Local Regulations: It’s essential to research and understand your local regulations regarding the disposal of old caulk, as some formulations may contain chemicals classified as hazardous. Municipalities often have specific guidelines to ensure safe disposal and to protect the environment, so consulting local waste management resources can provide clarity.
Seal in a Container: After removing the caulk, place it in a sturdy, sealed container, such as a plastic bag or a dedicated waste container. This prevents the caulk from leaking and contaminating other materials or the environment during transport to a disposal site.
Household Hazardous Waste Collection: Many areas hold regular events for collecting hazardous household items, including old caulk. Participating in these collections ensures that the caulk is disposed of in an environmentally safe manner, often by professionals who can handle such materials appropriately.
Regular Trash Disposal: If the caulk is confirmed to be non-hazardous, you can dispose of it in your regular trash. However, it is advisable to confirm the caulk’s safety status and check local guidelines to avoid potential fines or issues with waste disposal.
What Common Mistakes Should Be Avoided When Removing Bathtub Caulk?
Here are some common mistakes to avoid when removing latex bathtub caulk:
- Using the Wrong Tools: Many people use metal scrapers or knives, which can easily damage the tub’s surface. Instead, opt for plastic scrapers or caulk removal tools designed specifically for this purpose to avoid scratches.
- Not Softening the Caulk First: Attempting to remove caulk without softening it can lead to a frustrating experience. Applying a caulk remover or using a heat gun can help to loosen the latex caulk, making it easier to peel away without excessive force.
- Rushing the Process: Removing caulk in a hurry can result in incomplete removal and leftover residue. Take your time to ensure that all old caulk is thoroughly removed to create a clean surface for the new application.
- Neglecting to Clean the Surface: Failing to clean the area after caulk removal can lead to poor adhesion of the new caulk. It’s important to wipe down the tub with a suitable cleaner to remove any remnants of the old caulk and ensure a proper seal.
- Skipping Safety Precautions: Not wearing protective gear such as gloves or goggles can lead to skin irritation or eye injuries. Always make sure to use personal protective equipment to safeguard yourself during the removal process.
How Can You Prevent Latex Caulk from Building Up in the Future?
To prevent latex caulk from building up in the future, consider the following strategies:
- Regular Cleaning: Maintaining a consistent cleaning routine can significantly reduce the buildup of soap scum and mildew on caulked surfaces.
- Use a Caulk Remover Tool: Employing a specialized caulk remover tool can help in lifting and removing excess caulk before it hardens.
- Choose the Right Caulk: Selecting high-quality, mildew-resistant latex caulk can minimize future issues with buildup and deterioration.
- Seal Joints Properly: Ensuring that joints are sealed correctly at installation can help prevent water from penetrating and causing damage.
- Ventilation: Improving ventilation in bathrooms can help reduce humidity levels, making it less conducive for mold and mildew growth.
Regular Cleaning: Keeping surfaces clean with regular cleaning can help prevent the accumulation of dirt, soap scum, and mildew. By using a gentle cleanser and a soft cloth, you can keep the caulk looking fresh and reduce the need for more extensive removal processes later on.
Use a Caulk Remover Tool: A caulk remover tool is specifically designed to scrape away old caulk without damaging the surrounding surfaces. This tool can help you remove excess caulk during initial application, preventing bulky buildup that can occur over time.
Choose the Right Caulk: Opting for a high-quality, mildew-resistant latex caulk can make a significant difference in future maintenance. These products are designed to resist mold growth and have better adhesion, which can help them last longer and require less frequent replacement.
Seal Joints Properly: Proper installation of caulk is critical to its longevity and effectiveness. Ensure that joints are clean, dry, and appropriately prepped before applying caulk to prevent moisture infiltration, which can lead to mold and caulk deterioration.
Ventilation: Adequate ventilation in bathrooms helps to circulate air and reduce humidity, which is a key factor in mold growth. Installing exhaust fans or keeping windows open can help maintain lower moisture levels, thus prolonging the life of your caulk and reducing future buildup issues.
Related Post: